Blesta to WHMCS Migration Made Easy
TL;DR
- Migrating from Blesta to WHMCS involves setting up WHMCS, exporting data from Blesta, using the WHMCS import tool, and rigorously testing to ensure accurate data transfer.
- WHMCS offers broader automation, integrations (like cPanel, Plesk, PayPal, Stripe), and scalability compared to Blesta’s simpler but less integrated platform.
- Before migration, audit your Blesta system, back up files and databases, and verify your server meets WHMCS’s technical requirements to prevent data loss.
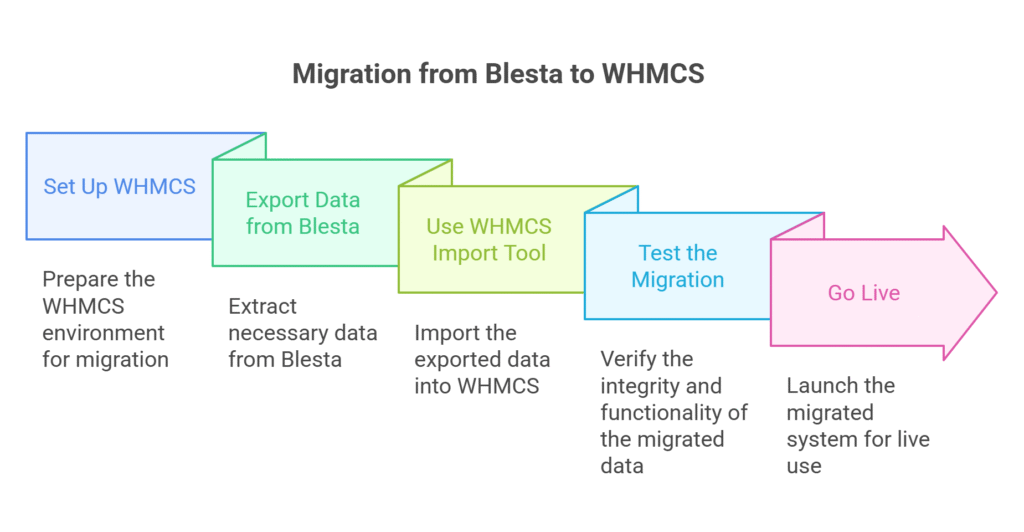
- Follow a clear migration process: install WHMCS, configure company settings, export Blesta data, import it into WHMCS, test everything, and then go live.
- Post-migration, review client data, automation, payment gateways, and support systems, and explore WHMCS add-ons for better efficiency and customization.
- SkyNetHosting.net provides free WHMCS licenses with its reseller plans, making the Blesta-to-WHMCS migration cost-effective, guided, and fully supported.
Migrating from one platform to another can be a daunting task, especially when it comes to essential tools powering your business.
For web hosting providers and IT professionals, moving from Blesta to WHMCS offers new opportunities. It allows them to optimize their operations with greater efficiency and automation.
At Skynethosting.net, we pride ourselves on over 23 years of excellence in the web hosting industry. Thousands of our customers have kickstarted their web hosting business journeys through our reseller hosting plans, leveraging our reliable and innovative solutions.
This guide simplifies the migration process, ensuring a smooth transition from Blesta to WHMCS.
Introduction to Blesta and WHMCS
What is Blesta?

Blesta is a billing and support platform designed to manage web hosting businesses. Known for its clean interface, it offers critical tools like automated billing, client management, and support ticket systems.
What is WHMCS?

WHMCS (Web Host Manager Complete Solution) is a leading web hosting automation platform. It encompasses everything from billing and client management to advanced automation and integrations, making it the preferred choice for hosting businesses worldwide.
For more detailed information, check out our What is WHMCS? Complete Guide.
What is difference between Blesta vs WHCMS
| Feature | Blesta | WHMCS |
|---|---|---|
| User Interface | Clean and minimalist design | Modern but more complex interface |
| Customizability | Highly customizable with open code | Customizable with limited open-source access |
| Automation | Extensive automation tools | Comprehensive automation features |
| Third-Party Integrations | Fewer out-of-the-box integrations | Wide range of pre-built integrations |
| Pricing | Generally more affordable | Typically more expensive |
| Support | Responsive with a smaller user base | Larger support resources available |
| Target Audience | Smaller to medium-sized businesses | Both small and large enterprises |
This comparison highlights how Blesta and WHMCS cater to different needs and preferences, allowing businesses to choose the solution that best fits their requirements.
Why Migrate from Blesta to WHMCS?
- Feature-Rich Platform
While Blesta is functional, WHMCS stands out due to its robust feature set, including extensive integrations for cPanel/WHM, Plesk, and payment gateways like PayPal and Stripe.
- Advanced Customization Options
WHMCS allows for greater flexibility with its advanced API, custom themes, and modules, ensuring a tailored experience for your business.
- Scalable Solutions
WHMCS is designed for growth, offering tools to manage increasing clients and hosting needs smoothly.
- Enhanced Automation
WHMCS significantly reduces manual efforts with its comprehensive automation capabilities, from provisioning to customer updates.
- Industry Support and Community
WHMCS has a vast community and extensive documentation, ensuring that help is never more than a few clicks away.
How to Preparing for the Migration
Before you begin, preparation is essential for a successful migration.
Steps to Prepare:
1. Audit Your Current System
Take stock of all the data currently in Blesta, including client profiles, invoices, service plans, and tickets.
- Step 1: Review Client Profiles
Go through all the client profiles in Blesta. Verify that the information is accurate and up to date, ensuring there are no duplicates or missing data. - Step 2: Check Invoices
Audit all invoices in the system. Confirm that they are properly issued, paid, or marked as outstanding, and ensure there are no discrepancies. - Step 3: Evaluate Service Plans
Review all service plans to see if they align with your current offerings. Update or remove outdated plans as needed. - Step 4: Inspect Support Tickets
Look through the existing tickets to ensure they are resolved and properly categorized. Archive any old or unnecessary tickets to maintain a clean system.
2. Create a Backup
Always back up all your Blesta data to ensure nothing is lost during the transition.
- Step 1: Choose a Backup Method
Decide how you want to back up your Blesta data. You can use built-in backup tools, third-party software, or manual methods like exporting files and databases. - Step 2: Back Up the Database
Export your Blesta database using your hosting provider’s control panel (e.g., phpMyAdmin) or through the command line. Save the database file securely. - Step 3: Back Up the Files
Copy all Blesta files from your web server, including configuration files, custom themes, and plugins. Use an FTP client or your hosting file manager for this step. - Step 4: Verify the Backups
Ensure that both the database and files are backed up completely and stored in a safe location. Test the backups if possible to confirm they work. - Step 5: Store Backups Securely
Save your backups in a secure place, such as cloud storage or an external hard drive, to protect them from loss or damage.
3. Review WHMCS Requirements
Ensure your server meets WHMCS’s minimum software and hardware requirements.
- Step 1: Check WHMCS Documentation
Visit the official WHMCS documentation or website to find the minimum software and hardware requirements for the version you plan to install. - Step 2: Verify Server Software
Ensure your server has the required software installed, such as the correct PHP version, database type (e.g., MySQL), and any necessary extensions or modules. - Step 3: Check Server Hardware
Confirm that your server meets the hardware specifications, including sufficient CPU, RAM, and storage space, to support WHMCS and its operations. - Step 4: Update Server Configuration
If your server doesn’t meet the requirements, update or upgrade the necessary components to ensure compatibility with WHMCS. - Step 5: Test Compatibility
Run a compatibility test or review WHMCS’s system health check after installation to confirm everything is set up properly.
4. Plan Downtime
Inform your clients about the migration and schedule it during non-peak hours.
- Identify the best time for the migration by analyzing when your clients are least active (non-peak hours).
- Inform your clients about the planned downtime well in advance, so they can prepare for any temporary disruptions.
- Clearly communicate the expected duration of the downtime and what they can expect during the migration process.
- Ensure your team is ready to execute the migration efficiently during the scheduled window..
Step-by-Step Migration Process
Here’s a detailed guide on how to migrate from Blesta to WHMCS.

Step 1: Set Up WHMCS
1. Purchase and Download WHMCS
Start by purchasing WHMCS from their official website. Once your purchase is complete, download the WHMCS installation files to your computer.
If you’re looking to save costs, you can get WHMCS for free by signing up for one of Skynethosting’s reseller hosting plans.
Skynethosting includes a free WHMCS license with reseller packages, making it a convenient and cost-effective option for your hosting business.
2. Install WHMCS on Your Server
Upload the downloaded files to your server. Use the WHMCS installation wizard to guide you through the setup process step by step. This tool will help you install WHMCS correctly and ensure it’s ready to use on your server.
For a detailed walkthrough, check out our step-by-step guide on How to Install WHMCS to ensure a smooth installation process.
3. Configure Basic Settings
After installation, log in to your WHMCS admin dashboard. Set up your company details, such as the business name, contact information, and branding.
Next, configure payment gateways to enable transactions and set up email templates for customer communication. This ensures your system is ready to manage billing and client interactions smoothly.
Step 2: Export Data from Blesta
- Open Blesta and go to the export section.
- Export files for your clients, invoices, and products.
- Check that the data is formatted correctly so it works with the new system.
Step 3: Use the WHMCS Import Tool
- Log in to the WHMCS Admin Area.
- Use the import tool provided by WHMCS.
- Match the data fields from Blesta to the correct fields in WHMCS.
Step 4: Test the Migration
- Check that all client information, invoices, and support tickets have moved over correctly.
- Test the system by doing things like creating invoices, activating services, and submitting support tickets to make sure everything works as expected.
Step 5: Go Live
- After testing is finished, make sure your WHMCS installation is available for everyone to access.
- Let your clients know that the migration is done and provide them with their new login details if needed.
Post-Migration Checklist
To ensure a seamless transition, here’s what to check post-migration:
- Client Data Accuracy: Make sure all customer details, products, and invoices are correctly migrated.
- Automation Settings: Update and test all automation processes, including billing and provisioning.
- Support Functionality: Test ticketing systems to ensure customers can contact you smoothly.
- Payment Gateways: Verify your payment gateway integration and test transactions.
Optimizing WHMCS After Migration
WHMCS offers numerous features that help businesses optimize post-migration.
Suggestions for Optimization:
- Client Communication
Customize email templates to improve communication with clients. WHMCS allows for automated, yet personal emails.
- Explore Add-ons
Expand your business potential with add-ons like Project Management, Fraud Detection, and more.
- Integrations
Automate operations by integrating WHMCS with platforms like cPanel, DirectAdmin, or third-party CRMs.
- Regular Updates
Ensure you’re always running the latest WHMCS version for improved performance and security.
Troubleshooting Common Issues
Migrating between platforms isn’t always flawless. Here’s how to tackle common issues during Blesta-WHMCS migration.
Missing Data
Double-check your data mapping during the import process and re-import specific datasets if necessary.
Automation Failures
Verify that cron jobs are correctly set up in WHMCS to enable automated tasks.
Login Issues
Reset passwords for clients if they encounter login problems and ensure WHMCS session handling is enabled.
Get Free WHMCS with SkyNetHosting.net
At SkyNetHosting.net, we’ve spent over two decades helping businesses succeed in web hosting.
Thousands of our customers began their hosting businesses through our reseller hosting plans. We’ve seen firsthand how WHMCS can revolutionize operations.
Get WHMCS for free today and streamline your hosting business with ease!
Take the Next Step Toward Success
Migrating from Blesta to WHMCS is an opportunity to transform how you manage your web hosting business. With enhanced automation, customization, and unparalleled community support, WHMCS equips your organization for future growth.
Explore reseller hosting with SkyNetHosting.net today and transform your hosting experience!
FAQs
What is the purpose of migrating from Blesta to WHMCS?
What are the main differences between Blesta and WHMCS?
Blesta offers open-source customizability and a minimalist interface, while WHMCS provides stronger automation, wider integrations, and enterprise-level scalability. WHMCS suits businesses seeking advanced features and growth-ready solutions for managing clients, billing, and hosting operations efficiently.
How should you prepare for migration from Blesta to WHMCS?
Preparation involves auditing client data, invoices, and service plans; backing up all files and databases; checking WHMCS system requirements; and scheduling downtime. Proper preparation ensures a smooth, error-free transition without data loss or prolonged disruptions.


