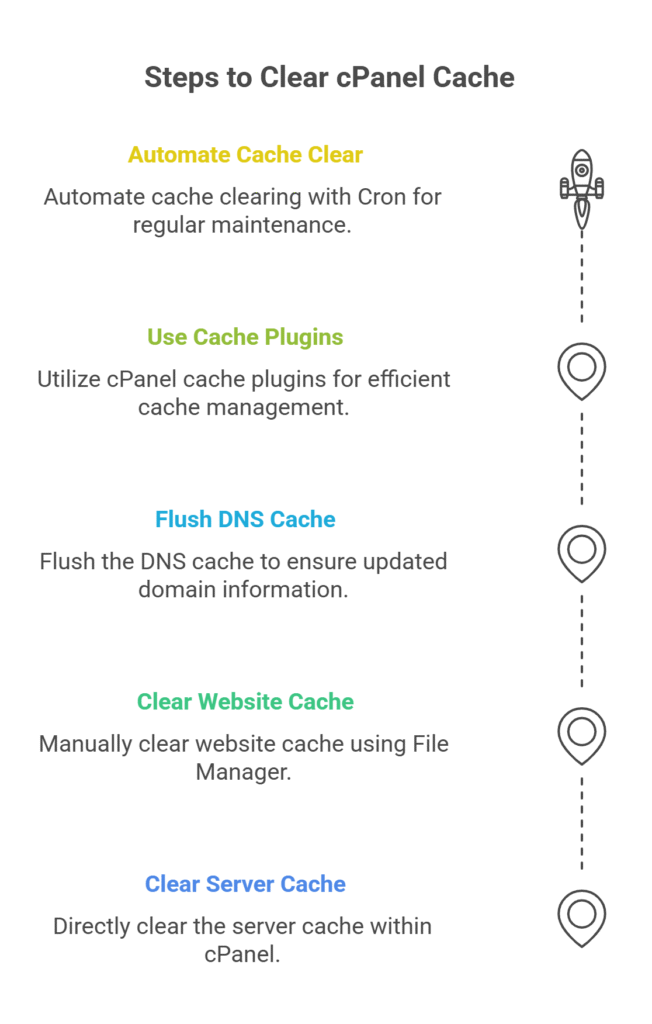
5 Effective Ways to cPanel Clear Cache in 2026
TL;DR: cPanel Clear Cache 2025 – Key Takeaways to Boost Site Speed
- Over time, cache buildup in cPanel can slow down your website; regular cache clearing is crucial for faster performance and better user experience.
- Clear cache using cPanel’s built-in management tools, manually via File Manager, or by flushing DNS cache for both server-side and website cache.
- WordPress and similar CMS users can automate cache clearing with plugins or cPanel Cron Jobs, streamlining performance boosts.
- Cache clearing helps ensure visitors see the most up-to-date content, reduces server load, and improves troubleshooting for speed issues.
- Automated and regular cache management minimizes manual work for admins, lowering bounce rates and optimizing performance, which indirectly benefits SEO outcomes.
- Multiple cache types exist within cPanel (server-side, application, DNS), so a thorough approach is needed for truly optimal results.
Introduction
Being aware of how to cPanel clear cache is pertinent if you want to ensure that your website runs without any hindrance. So to any one – site owners, digital marketers, web developers, hosting and reseller owner or start-up founders.
Clear cache must be done regularly by our site owners! This is an important task. In this guide we will be discussing how to do a cPanel clear cache to keep your website fast and efficient. To flush server cache in cPanel or How to clear website cache in cPanel, learn from here.
Want to watch these steps in action? Be sure to look at our cPanel demo, and see how easy it is for you to purge your cache and optimize your site!
Understanding Cache and Its Importance
Before explaining how to clear server cache in cPanel, Let me explain a bit on what is cache. Cache saves replicated versions of your files and data so that the load time can be faster and a better website performance!
For instance, when visiting a website, the browser caches some parts of it such as images, CSS and JavaScripts. Coming back, those elements are gotten from he cache instead of reloaded from the server.
But cached files get out of date and cause problems. Even if content changes much, and you don’t refresh the cached files, visitors may experience the older version of your website.
Regularly clearing your cache makes sure that visitors can view the most current copy of your site. This enhances their experience and ensures your website functions properly.
Clear server cache in the cPanel Make sure that nothing is using more resources than it needs to, and to avoid large file systems needing unnecessary system disk space cleaning.

How to Clear Server Cache in cPanel?
To Clear Server Cache in cPanel To clear server cache, please do the following:
1. Log in to cPanel:
Login to your cPanel with your login details. If you are not sure of your login information, contact your web host for this information. Make sure that you have administrator privileges to do cache cleaning operations.
2. Go to the Cache Management Area:
After you login, the cPanel dashboard will appear. Search for “Cache” or “Caching,” which is usually available somewhere in the option under “Advanced.” If you can’t find yours, feel free to search the dashboard’s search bar at the top of the page and access that area easily.
3. Clear the Cache:
When in the Cache Management area, you will find links to manage and clear your cache. press and hold Home button a holding the power button, you will see option clear cache click that!
This will wipe the cache of all your files and make sure that your server program serves out the most recent data to surfers.
Clearing your server caches can speed-up overall website performance, especially after updates to your site.
It helps to keep all your visitors viewing the latest HTML. without caching files that are already outdated. Further, frequently clearing the cache can even be useful in troubleshooting website loading and speed issues.
How to Clear Cache in cPanel Website?
You can follow the method of clearing cache in cPanel below. This can be a very effective way to increase the amount of visitors to your site and keep your visitors informed. Here’s a step-by-step guide to how you can:
1. Accessing the File Manager:
First, you need to log in your cPanel account. You can generally find it on your hosting provider’s dashboard.
When you’re inside cPanel, “File Manager” section. You can control all your site files and folders using this tool.
2. Locating the Cache Folder:
In the left panel of your File Manager, navigate to where your website saves cached files. It is usually in the folder where you publish your web pages on the server. (This would generally be “public_html”)
According to your CMS or website, the cache folder should be named “cache”, “tmp”, or something with a specific name for storing cached files.
3. Deleting Cache Files:
Choose “Selected cached files…” to delete some of your cache. That could be temporary files, like html/css/js or even saved as part of caching to aquentially load certain request’s.
To remove some individual cached files, just click them with the right mouse button and select Delete or press the delete button of the File Manager toolbar.
Be mindful you do not remove any core files, which are required for your website to work.
Additional Tips:
- Always Back Up: Be sure to back up your site before you delete files. This way, you’ll be able to bring back anything deleted by mistake.
- Routine Checkups: Should you remind yourself periodically to empty your cache so the drain doesn’t clog.
- Utilize Plugins: Utilize some plugins or software which do the work of clearing cache automatically. Especially beneficial to CMS like WordPress.
Manually clearing your website cache is a bit more tedious, but allows you to control exactly what you delete. This works on individual cached files, not entire cache. Such a management of your website could help you manage the site better and make it more user friendly.
How to Clear DNS Cache?
DNS cache can have an effect on the ability to reach websites, too. Here’s how to clear DNS cache:
1. Open Command Prompt (Windows):
Type `ipconfig /flushdns` and press Enter.
2. Terminal (MacOS):
Enter `sudo killall -HUP mDNSResponder` and press Enter.
Flushing your DNS cache can remedy outdated or otherwise yearning IP address or DNS reords. It makes sure your device is always connected to the most up-to-date DNS, providing faster browsing and quicker access to your site.
4. Using cPanel Plugins to Clear Cache
Just a note, you can also clear cache in cPanel plugins:
1. Install a Cache Plugin:
If you have a WordPress website you can install plugins such as WP Super Cache or W3 Total Cache through cPanel. These plugins take care to cache everything automatically so that you don’t have to deal with it. They‘ll usually include a setup guide or wizard when installed so that you can set up the basic options easily.
2. Configure and Clear Cache:
Control and clear cache right from plugin settings. For the most part you’ll find plugins that make it all user-friendly and easy. You can set the interval for automatic cache clearing, exclude pages or files from being cached, and look at improvements in site performance as they happen.
It’s easy when you use caching plugins, at least for the not-so-techies. They’re able to automate tasks and help you clean up your site with little lift from the human being.
These plugins come with CDN integration, minify HTML, CSS and JavaScript files and in-depth analytics for performance monitoring. This method optimizes loading process and provides rigid user interface.
Automating Cache Clearing in cPanel
You can automate the cache clearing process to ensure your site keeps on running fast and optimized, without any manual efforts.
1. Set Up Cron Jobs:
Automatic clearings can be scheduled using cPanel’s ”Cron Jobs. It allows you to schedule when clearing the cache for optimal page loading times and up-to-date content.
Employ simple commands to execute scripts at various intervals, so that your site is not slowed with content that is outdated.
2. Script Execution:
Script to clear cache and schedule the script for run on timely basis. And this is how the two scripts can delete cache types but it requires servers along with CMS’s power commands! Downloading your content automatically saves you time, which means you can concentrate on other aspects of site management.
Additionally, regular cache clearance helps with how quickly your site loads and your visitors experience.
Busy website administrators need to be able to automate things. By setting a cron job you ensure your site’s cache will be cleared automatically on schedule, improving the performance of your website.
It mitigates bounce rates and increases site availability. Efficient cache management by automation is a solid weapon in the fast and busy digital world.
Benefits of Regular Cache Clearing
There are several advantages to regularly clearing your cache:
1. Improved Website Speed:
The faster the loading speed, the better users experience. A fast-loading site is appealing to visitors and will reduce bouncing.
2. Updated Content Display:
Make visitors read the most recent posts. This is especially important for sites with dynamic content.
3. Reduced Server Load:
Saves server resources - all graphics are prepared and produced by one client, so there is no load on your server. A server with less load can obviously serve more traffic which ultimately means smoother experience for the users.
To maximize efficiently, a fresh cache is crucial. It maximizes your site’s performance, giving a seamless experience to your visitors.
Conclusion
Performing a cPanel clear cache is essential for maintaining optimal website performance. By following the steps outlined in this guide, you can ensure your site runs smoothly and efficiently. Regularly clearing your cache improves website speed, ensures visitors see the latest content, and reduces server load.
For dependable cPanel reseller hosting plans, check out SkyNetHosting.Net Explore our premium cPanel reseller hosting, featuring robust features and excellent support. Effortlessly manage and expand your hosting business with us.
Frequently Asked Questions about cPanel Cache
What exactly is cPanel cache and why do I need to clear it?
cPanel cache refers to temporary data stored by your server, website, or browser to make your site load faster. You need to clear cache cPanel regularly, especially after making updates, to ensure visitors see the latest content and to boost site speed by removing outdated files.
How often should I perform a cPanel Clear Cache?
The frequency for cPanel Clear Cache depends on how often you update your website. If you frequently add new content or make design changes, you might need to clear cache in cPanel daily or weekly. For less active sites, once a month might suffice, or whenever you notice outdated content.
Is there any risk in clearing my cPanel cache? Will it break my website?
No, performing a cPanel cache clear is generally safe and will not break your website. It simply removes temporary files that will be regenerated as needed. Always back up your site before major changes, but routine clear cache cpanel operations are low risk.
I’ve cleared my cache, but my changes aren’t showing. What else can I do?
If your changes aren’t appearing after you clear cache in cPanel, you might need to clear your browser’s cache (Ctrl+F5 or Cmd+Shift+R) or check your CDN cache if you use one. Sometimes, DNS propagation also causes delays. Our full guide explains how to clear cache in cPanel comprehensively.
Can I automate the process to clear cPanel cache regularly?
Yes! Our article on cPanel Clear Cache 2025 provides details on how to clear cache in cPanel automatically using Cron Jobs. This ensures your cPanel cache is consistently maintained for optimal performance without manual intervention.
Does clearing cPanel cache help with my website’s SEO?
While cPanel Clear Cache doesn’t directly boost SEO rankings, it significantly improves website speed. Faster loading times enhance user experience, reduce bounce rates, and are a positive ranking factor for search engines. So, yes, maintaining a clear cache cPanel indirectly supports your SEO efforts.
Are there different types of cache in cPanel, and do I need to clear them all?
Yes, there are various types, including server-side cache (like LiteSpeed or Varnish), application-specific cache (e.g., WordPress), and DNS cache. Our guide on how to clear cache in cPanel covers the 5 main types and methods for a thorough cPanel cache clear, ensuring optimal performance.
My WordPress site uses a caching plugin. Do I still need to clear cPanel cache?
Yes, a WordPress caching plugin primarily handles your website’s application cache. You still might need to perform a cPanel Clear Cache for server-side cache or to clear cache in cPanel via the File Manager for residual files that your plugin might miss, ensuring a complete clear.
What are common signs that my cPanel cache needs to be cleared?
Key signs include website changes not appearing, slow loading times, or old content being displayed. If you’re seeing outdated information or experiencing performance issues, it’s a strong indicator that you need to clear cache cPanel to ensure the freshest content is served.
Can clearing my cPanel cache resolve website errors or blank pages?
Sometimes, yes. Outdated or corrupted cache files can occasionally lead to display errors or blank pages. Performing a cPanel cache clear can often resolve these transient issues by forcing the system to regenerate fresh data, making it a good first troubleshooting step.
Why should I clear cache in cPanel?
How often should cPanel cache be cleared?
The ideal frequency depends on how often you update your site. For active sites, clear cache daily or weekly. Less frequently updated sites should clear cache monthly, or whenever you notice slow load times or outdated content.


