How to Set Up a Gaming Server: Complete Beginner’s Guide
TL;DR: How to Set Up a Gaming Server
- Setting up your own gaming server offers full control, customization, better performance, privacy, cost savings, and valuable server management skills.
- Choose between peer-to-peer (hosted on your PC) and dedicated servers (separate hardware for optimal performance), based on your needs and player size.
- Make sure you have adequate hardware (CPU/RAM), a fast upload speed, and either a static IP or a domain for stable connections.
- Decide between running your server at home (low cost), on a VPS (balanced option), or on a dedicated server (best for high performance and large communities).
- Follow basic setup instructions: install the server software, configure ports and firewalls, and customize with mods or plugins for a unique experience.
- Regularly maintain your server with backups, updates, and performance monitoring; use clear rules and tools for managing players and security.
Want to host your own gaming server but don’t know where to start? Setting up a gaming server might seem complicated, but it’s actually straightforward once you know the steps.
This guide will walk you through everything you need to know. You’ll learn about server types, hardware requirements, and step-by-step setup instructions. By the end, you’ll have your own gaming server running smoothly.
Whether you want a private server for friends or a public server for the community, this guide has you covered. Let’s get started.
Why Should You Set Up Your Own Gaming Server?
Take full control of your gaming experience with powerful customization options, seamless performance, and tools designed to enhance every moment, giving you the ultimate edge in every game..
When you run your own server, you make the rules. You can choose the maps, set player limits, and decide who gets banned. No more dealing with toxic admins or servers that go offline without warning.
Here are the main benefits:
- Better Performance: Your server runs exactly how you want it. No lag from overcrowded public servers.
- Custom Rules: Set your own game modes, difficulty levels, and time limits.
- Privacy: Only invite players you trust. No random trolls ruining your game.
- Mods and Plugins: Install custom content that most public servers don’t allow.
- Cost Savings: Split hosting costs with friends instead of paying for premium server access.
- Learning Experience: Gain valuable tech skills in server administration.
What Types of Gaming Servers Can You Choose From?
There are two main types of servers used in networks: peer-to-peer servers, where devices share resources equally, and dedicated servers, designed to efficiently manage and deliver resources to connected devices.
- Peer-to-peer servers run on your gaming computer. One player hosts the game while others join. This works fine for small groups but has limitations. The host’s internet speed affects everyone’s experience.
- Dedicated servers run on separate hardware. They don’t depend on any player’s computer or internet connection. This gives better performance and stability.
Popular games that support custom servers include:
- Minecraft
- Counter-Strike: Global Offensive
- ARK: Survival Evolved
- Rust
- Garry’s Mod
- Team Fortress 2
- Left 4 Dead 2
Most modern multiplayer games support some form of private server hosting.
What Do You Need Before Setting Up Your Gaming Server?
Before getting started, it’s important to ensure you meet three key requirements. These include understanding the necessary guidelines, having the right tools or resources in place, and being clear about your objectives to move forward effectively..
- Hardware Requirements: Your server needs enough processing power and RAM. While a small server for a game like Minecraft might only need 2GB of RAM, more demanding titles such as ARK: Survival Evolved often require 8GB or more to run smoothly. Always consult the official server requirements on the game developer’s website for the most accurate and up-to-date information.
- Internet Speed: Upload speed matters more than download speed for servers. You need at least 1 Mbps upload per 4-5 players. For 20 players, aim for 5 Mbps upload speed.
- Operating System: Most game servers run on Windows or Linux. Windows is easier for beginners. Linux costs less and uses fewer resources but requires more technical knowledge.
- Static IP or Domain: Players need a consistent address to connect to your server. You can use a static IP from your internet provider or get a domain name.
How to Choose the Right Hosting Solution?
When choosing a hosting solution, you have three main options: a home server, a Virtual Private Server (VPS), or a dedicated server. Each option offers unique benefits and caters to different needs and levels of technical expertise.
- Home Server: Run the server on your own computer or a spare machine. This costs less but uses your home internet. Your server goes offline when your internet goes down.
- VPS (Virtual Private Server): Rent virtual server space in a data center. This gives better uptime and internet speeds than home hosting. VPS plans start around $10-20 per month.
- Dedicated Server: Rent an entire physical server. This offers the best performance but costs more, with plans typically starting around $50-$100 per month. These are ideal for large, high-traffic servers with hundreds of players. For most gamers, a VPS offers the best balance of cost and performance. At SkyNetHosting.net, our high-performance VPS solutions with NVMe storage are specifically optimized for gaming. This technology delivers up to 200% faster performance compared to traditional SSDs, ensuring your server loads faster and handles more players smoothly.
For most gamers, a VPS offers the best balance of cost and performance. You get professional hosting without paying for resources you don’t need.
SkyNetHosting.Net offers high-performance VPS solutions with global locations and 24/7 support. Their servers use NVMe storage that’s 200% faster than regular SSDs.
How to Install Game Server Software?
The installation process may differ slightly depending on the game, but the overall steps are generally the same. Typically, it involves downloading the game file, running the installer, following on-screen instructions, and ensuring the necessary system requirements are met. Once installed, you’re ready to launch and enjoy your game.
Let’s use Minecraft as an example:

- Step 1: Download the server software from the official website. For Minecraft, get the server.jar file.
- Step 2: Create a new folder for your server files. Upload the server software to this folder.
- Step 3: Run the server software once to generate configuration files. It will create files like server.properties and eula.txt.
- Step 4: Edit the EULA file to accept the license agreement. Change “eula=false” to “eula=true”.
- Step 5: Modify server.properties to configure your server settings. Set things like server name, game mode, and difficulty.https://ark.fandom.com/wiki/Dedicated_server
- Step 6: Start the server again. It will generate the game world and start accepting connections.
For other games like Counter-Strike or ARK, you’ll use Steam’s SteamCMD tool to download server files. The process is similar but uses different commands.
How to Configure Ports and Firewall Settings?
To allow players to connect to your server from the internet, it’s essential to have open ports. These ports enable communication between your server and external devices, ensuring seamless connections for multiplayer gameplay and online interactions.
- Find Your Game’s Port Numbers: Each game uses specific ports. Minecraft uses port 25565. Counter-Strike uses port 27015. Check your game’s documentation for the correct ports.
- Open Ports on Your Router: If hosting at home, log into your router’s admin panel. Look for “Port Forwarding” settings. Add rules to forward your game’s ports to your server’s local IP address.
- Configure Server Firewall: Your server’s firewall might block incoming connections. On Windows, go to Windows Firewall settings and create inbound rules for your game’s ports. On Linux, use iptables or ufw commands.
- Test Port Connectivity: Use online port checking tools to verify your ports are open. Tools like canyouseeme.org can test if your ports are accessible from the internet.
Security tip: Only open the ports your game actually needs. Don’t disable your entire firewall.
How Can You Customize Your Server with Mods and Plugins?
This is where your server stands out from the rest. It’s the place where customization, performance, and reliThis is where your server stands out. Customization is a key benefit of self-hosting, and it’s what allows you to create a unique experience for your community.
From enhancing game mechanics with mods to adding powerful management tools with plugins, you have complete control over the content and rules of your game.
Mods vs Plugins: Mods change game mechanics and add new features. Plugins add server management tools and commands. Some games support both, others support only one type.
Popular Mod Platforms:
- Minecraft: Forge, Fabric, or Bukkit/Spigot for plugins
- ARK: Steam Workshop integration
- Garry’s Mod: Built-in addon system
Installing Mods: Download mod files and place them in your server’s mods folder. Restart the server to load new mods. Players usually need the same mods installed to join.
Admin Commands: Set up admin accounts so you can manage the server while playing. Most games let you add admin users through configuration files or in-game commands.
Backup Before Changes: Always backup your server before installing new mods. Some mods can corrupt save files if they’re incompatible.
How to Test and Launch Your Server?
Testing ensures a smoother experience by identifying and fixing potential issues before inviting other players. It helps prevent glitches, improves gameplay quality, and ensures everyone enjoys a seamless and fun interaction.
Local Testing: Connect to your server using localhost or 127.0.0.1 as the server address. Make sure the game loads properly and basic features work.
External Testing: Ask a friend to connect using your external IP address. This tests if your port forwarding and firewall settings work correctly.
Performance Testing: Run the server with multiple test accounts or bots if available. Monitor CPU and RAM usage to make sure your server can handle the expected player count.
Common Launch Issues:
- Players can’t connect: Check port forwarding and firewall settings
- Server crashes with multiple players: Increase RAM allocation
- High lag: Check your internet upload speed and server CPU usage
Once testing is complete, share your server’s IP address with friends or post it on gaming forums.
How to Manage Your Server Long-Term?
Running a server is an ongoing responsibility that requires consistent monitoring, maintenance, and updates to ensure optimal performance and security. It involves managing hardware, software, and addressing any technical issues to keep systems running smoothly and efficiently.

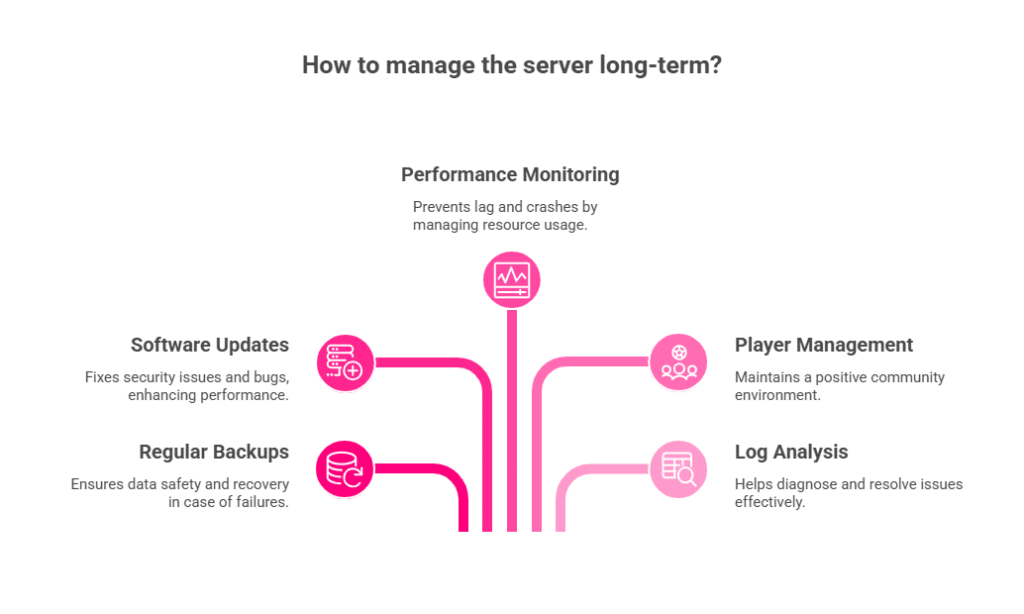
- Regular Backups: Set up automatic backups of your game world and configuration files. Most hosting providers offer backup services. For home servers, use tools like rsync or simple copy scripts.
- Software Updates: Keep your game server software updated. New versions often fix security issues and bugs. Subscribe to your game’s official announcements for update notifications.
- Performance Monitoring: Watch your server’s CPU, RAM, and disk usage. High resource usage causes lag and crashes. Consider upgrading your hosting plan if you consistently hit resource limits.
- Player Management: Establish clear rules and enforce them consistently. Use ban lists for problematic players. Many games support whitelist systems for private servers.
- Log Analysis: Check server logs regularly for errors or unusual activity. Logs help diagnose performance problems and security issues.
Why Choose SkyNetHosting.Net for Your Gaming Server?
SkyNetHosting.Net specializes in providing high-performance hosting solutions designed specifically for gaming servers, offering reliability, speed, and seamless performance to meet the demanding needs of gamers and developers.
- Global Network: With 25 worldwide locations, you can host your server close to your players for minimal latency.
- Fast Hardware: NVMe storage delivers 200% faster performance than standard SSDs. Your server loads faster and handles more players smoothly.
- 24/7 Support: Expert technicians are available around the clock to help with technical issues. No waiting days for email responses.
- Scalable Plans: Start small and upgrade as your player base grows. VPS plans begin at affordable rates with easy upgrades available.
- Enterprise Features: Get features like automated backups, DDoS protection, and server monitoring included with your hosting plan.
Their hosting infrastructure is specifically optimized for gaming applications with low-latency networking and high-performance processors.
Ready to Start Your Gaming Server Journey?
Setting up a gaming server opens up new possibilities for your gaming experience. You get complete control, better performance, and the ability to create exactly the gaming environment you want.
The key steps are simple: choose your hosting solution, install the game server software, configure your network settings, and customize with mods or plugins. With proper planning and the right hosting provider, you’ll have your server running smoothly in no time.
SkyNetHosting.Net offers the reliable, high-performance hosting infrastructure you need for a successful gaming server. Their global network and expert support team make server management easier so you can focus on gaming.
Ready to get started? Check out SkyNetHosting.Net’s VPS hosting plans and launch your gaming server today.
FAQs
What are the main benefits of hosting my own gaming server?
Hosting your own gaming server lets you control performance, privacy, custom rules, and mods. You can invite only trusted players, set game modes, and gain tech skills in server management, leading to a tailored, seamless gaming experience for your group.
What hardware and internet speed do I need for a gaming server?
Your server should meet the game’s official hardware requirements. For example, Minecraft may need just 2GB RAM, while ARK requires 8GB or more. Upload speeds matter most; at least 1 Mbps per 5 players ensures smooth and lag-free gameplay.
What’s the difference between peer-to-peer and dedicated game servers?
Peer-to-peer servers run on a player’s computer, suitable for small groups but dependent on one person’s setup. Dedicated servers use separate hardware, offering much better stability and performance, ideal for public servers with lots of players joining regularly.
Which hosting solution is best—home server, VPS, or dedicated server?
Home servers are cheapest but depend on your internet and go offline easily. VPS hosting balances cost, uptime, and speed for most users. Dedicated servers deliver top performance for high-traffic servers but are pricier and suit advanced requirements.
How do I configure ports and firewall settings for my server?
Can I customize my server with mods and plugins, and how?
Absolutely! Download mods or plugins and add them to your server’s mod folder, then restart the server. Mods change game mechanics, while plugins add management tools. Always back up your server before adding new mods to avoid compatibility issues.
What steps ensure smooth server management after launch?
By Alex Chen | Gaming Server Specialist at SkyNetHosting.net
About the Author: Alex Chen is a dedicated gaming server specialist with over a decade of experience in network administration and server management. A lifelong gamer, Alex combines a passion for community building with deep technical expertise to help players and hosts create the ultimate gaming experience. He’s an advocate for high-performance, stable hosting solutions and frequently shares insights on optimizing servers for popular titles.


